DIY truck bed storage makes your pickup far more organized, secure, and useful—without paying for expensive custom systems. Most of the ideas in this guide use basic tools and straightforward builds. In general, for DIY truck bed storage you will need: a measuring tape, pencil, cardboard for mock-ups, plywood or lumber, screws, brackets or L-angles, a drill/driver, saw (hand saw or circular saw), sandpaper, weather-resistant paint or sealant, and basic hardware like hinges, latches, and handles.

Start by measuring your truck bed’s length, width between wheel wells, and height under the bed rails or tonneau cover. Sketch a simple plan, double-check that drawers or lids can open with your tailgate and cover closed, then build slowly—test-fitting pieces in the truck before final assembly whenever possible.
Below are 10 truck bed storage ideas, each with materials, basic how-to steps, and tips. At the end, you’ll find AI image prompts you can paste into an image generator to create visuals for each idea.
1. Full-Length Sliding Drawer System
A full-length drawer system turns your truck bed into a giant pull-out toolbox while keeping the top surface usable.
Materials needed
- 18 mm plywood (for base, drawer box, and top deck)
- Heavy-duty full-extension drawer slides (truck-bed rated) or DIY wooden runners
- Wood screws and L-brackets
- Measuring tape, circular saw, drill/driver
- Handles, latches, and optional carpet or rubber mat
- Wood sealant or exterior paint
How to make
- Measure the length of the bed (tailgate closed) and the width between wheel wells. Decide how tall the drawer box will be (often 25–3525–35 cm).
- Cut a base panel to fit the bed floor and side panels to set your drawer height.
- Build a rectangular “box” that fits snugly between wheel wells, leaving the tailgate able to close. Secure corners with screws and L-brackets.
- Inside this box, mount heavy-duty drawer slides to the sidewalls, or create smooth wood runners.
- Build a long drawer sized to slide within the box, adding dividers or compartments inside.
- Attach a front face with a sturdy pull handle and latches so the drawer stays closed when driving.
- Add a top deck on the box so you can still load cargo on top. Seal or paint all wood to protect from moisture.
Tip: Keep drawer weight in mind—solid wood plus tools can get heavy. Use lighter plywood where you can.
2. Modular Crate And Bin System
Modular crates and bins let you reconfigure storage quickly for workdays, camping trips, or grocery runs.
Materials needed
- Heavy-duty plastic crates or storage bins with lids
- Ratchet straps or cargo nets
- Bed rails or tie-down points
- Optional: DIY plywood dividers or a low platform
How to make
- Choose sturdy bins that stack securely and fit your bed width (test in-store or measure).
- Arrange bins in zones: tools, recovery gear, camping/kitchen, groceries, etc.
- If bins slide around, build a low plywood “frame” or U-shaped divider screwed to a plywood base that sits in the bed to corral them.
- Use ratchet straps, bungee cords, or cargo nets to secure stacks of bins to your bed’s tie-downs.
- Label each bin clearly so you can grab what you need fast.
Tip: Clear-lid bins help you see contents quickly; dark bins work better if your truck bed is often in sunlight.
3. DIY Over-The-Wheel-Well Shelves
Wheel wells waste a lot of side space. Simple shelves above them create slim storage for long or flat items.
Materials needed
- 18 mm plywood or 2×10 boards
- L-brackets and self-tapping screws
- Measuring tape, saw, drill/driver
- Sandpaper and sealant or paint
How to make
- Measure the height and width of each wheel well, plus the space above it up to the bed rail or cover.
- Cut a top shelf piece to span from the bed wall to just past the wheel well, and support pieces (legs) that stand on the bed floor.
- Build a small “L” frame that sits on the wheel well or around it, then secure the top shelf to the side supports with screws.
- Use L-brackets to connect the shelf unit to the bed wall (if allowed) or keep it freestanding but tight-fitting.
- Repeat on both sides if desired, leaving the central bed area open.
Tip: Use these shelves for things like straps, tarps, small tool bags, fishing rods, or camp chairs.
4. Under-Tonneau Low-Profile Storage
If you use a tonneau cover, low-profile storage keeps gear hidden without blocking the cover’s operation.
Materials needed
- Shallow bins or custom-built low boxes
- 12–15 mm plywood (for low boxes)
- Handles and simple latches
- Measuring tape, saw, drill/driver
- Bed mat or rubber liner (optional)
How to make
- Measure space between the bed floor and the underside of your tonneau when closed. This determines maximum box or bin height.
- Choose bins or build shallow wooden boxes that are low enough but wide/long enough to be useful.
- If building, make simple rectangular boxes with lids—hinged or lift-off—with finger cutouts or handles.
- Line the bed floor with a rubber mat to reduce sliding, then place boxes side by side.
- Use straps or built-in tie-downs to keep boxes from shifting, especially if they carry heavy tools.
Tip: Great for valuables because the tonneau and tailgate can be locked, hiding boxes from view.
5. Side-Mounted Tool Box Or Rail Cabinet
Side-mounted storage uses the upper rail area, keeping the floor clear for large loads.
Materials needed
- Aluminum or steel truck side box (store-bought) or custom plywood side cabinet
- Bolts or clamps compatible with your bed rails
- Drill/driver, wrench set
- Weather stripping (if DIY wood)
- Locks or latches
How to make (DIY cabinet version)
- Measure the length of the bed rail and decide how long you want the cabinet (short section vs. full side).
- Build a narrow rectangular box from plywood, deep enough to hold tools but not so deep it interferes with cargo.
- Add a front door that opens outward or downward, using sturdy hinges and a locking latch.
- Seal all edges, then apply weather-resistant paint and add foam or rubber weather-stripping around the door.
- Mount the cabinet to bed rails using metal brackets or bolts (ensure no drilling into sensitive areas like wiring).
Tip: Divide the inside into small sections so tools and small parts do not slide all over.
6. DIY Bed Slide Platform
A bed slide is like a giant sliding tray that brings everything to the tailgate—perfect for heavy coolers or toolboxes.
Materials needed
- 18 mm plywood for base tray
- Heavy-duty linear rails, roller tracks, or multiple small caster wheels
- Angle iron or 2×4 frame for strength
- Handles and locking pins or latches
- Drill/driver, saw, wrench set
How to make
- Build a strong rectangular frame that fits inside your truck bed, using 2×4s or metal angle.
- Create a matching plywood platform that sits inside this frame and will slide in/out.
- Mount roller tracks or casters under the platform, positioned on rails inside the frame so the platform glides smoothly.
- Add a handle at the tailgate end and locking points so the platform stays in place when driving.
- Test with weight and adjust rails or wheels until it moves smoothly without binding.
Tip: Keep the slide height low so you do not lose too much vertical space in the bed.
7. Vertical Divider System For Grocery And Gear
Vertical dividers stop items from rolling around. This system is simple and extremely useful for everyday driving.
Materials needed
- 12–18 mm plywood sheets
- Metal U-channel or wood cleats to hold dividers
- Screws and L-brackets
- Measuring tape, saw, drill/driver
How to make
- Measure the bed floor and decide how many “lanes” you want across the width (for example, 2 or 3 long compartments).
- Build a flat base or simply anchor cleats/U-channels directly to the bed floor (if allowed) to accept removable dividers.
- Cut several vertical panels that slide into those channels, standing upright to partition the bed.
- Space the channels so you can have one wide space for large items and narrower ones for groceries or bags.
- Make dividers removable so you can convert back to an open bed anytime.
Tip: Mark measurements on the base so you can quickly place dividers in consistent spots.
8. Hidden Storage Under Raised False Floor
A raised floor hides shallow storage underneath while giving a flat surface for loading.
Materials needed
- 18 mm plywood for a raised deck
- 2×4s or sturdy timber for support frame
- Hinges for lift-up access panels or removable lids
- Screws, drill, saw, measuring tape
- Carpet or rubber mat for the top
How to make
- Measure your bed and decide how high the raised deck will be (often 10–2010–20 cm).
- Build a grid frame with 2×4s that sits on the bed floor, with cross-supports every 30–4030–40 cm.
- Cut plywood panels to fit on top of this frame, leaving some sections hinged or removable as access panels.
- Secure most panels with screws, but use hinges and handles on the access sections.
- Cover the top with carpet or a rubber mat for grip and a finished look. Use the hidden compartments for tools, jack, straps, or emergency gear.
Tip: Be aware of your truck’s payload—wood adds weight. Use lighter lumber or metal if necessary.
9. Overhead Bed Rack With Hanging Storage
An overhead rack extends above the bed rails to carry long items and support hanging cargo.
Materials needed
- Metal truck rack or DIY steel/wood overhead rack
- Ratchet straps and hooks
- Bolt-on or clamp-on mounting hardware
- Optional: cargo net, hanging organizers
How to make (basic DIY concept)
- Buy or build an overhead rack that mounts to the bed rails or stake pockets. Ensure it clears the cab and tailgate.
- Once mounted securely, add hooks, D-rings, or eye-bolts along the sides and crossbars.
- Hang organizers, tool rolls, or small bags from these hooks using carabiners or straps.
- Use the top of the rack for lumber, kayaks, ladders, or rooftop storage boxes.
Tip: Combine with low-profile bed storage below for a two-level cargo system.
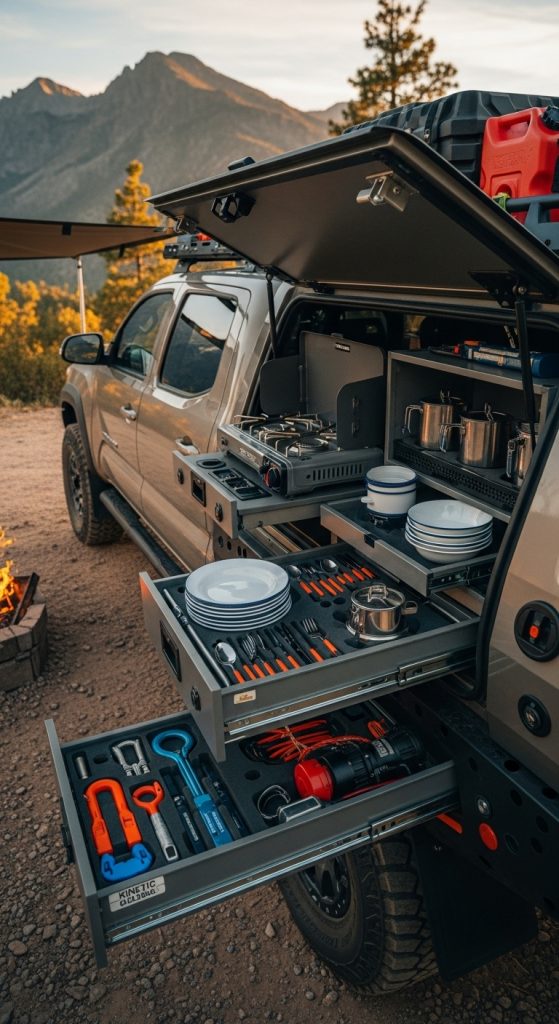
10. Slide-In Camping / Adventure Drawer System
For campers and overlanders, a dedicated adventure drawer holds kitchen gear, recovery tools, and camping essentials.
Materials needed
- 18 mm plywood or light composite panels
- Heavy-duty drawer slides
- Locks, latches, and handles
- Thin foam or rubber liner for inside drawers
- Measuring tape, saw, drill, sealant
How to make
- Start with your full-length drawer concept (idea 1), but plan multiple drawers or sections: for kitchen, tools, water, etc.
- Build a base box that fits under a sleeping platform or under a tall tonneau/canopy.
- Create two or three drawers side by side, each on its own heavy-duty slides.
- Add organizers inside the drawers for plates, stove, utensils, spices, and recovery gear.
- Seal everything well and consider adding locks if you carry valuable gear.
Tip: Design the top of the system strong enough to support a mattress if you plan to sleep in the bed.
General DIY Safety And Planning Tips
- Always measure at least twice before cutting wood or drilling into your truck.
- Check your truck manual for warnings about drilling near fuel lines, wiring, or bed sensors.
- Consider weight distribution: keep heavy items low and near the cab.
- Use weather-resistant materials and sealants to prevent rot and rust.
- Test storage systems with light loads before trusting them with heavy gear.